Comment moderniser votre TeslaModel 3 et Y pour la recharge CCS
Dans le paysage en constante évolution des véhicules électriques, la compatibilité et l'adaptabilité sont essentielles. Avec l'émergence de diverses normes de charge, il est essentiel pour les propriétaires de Tesla d'avoir la possibilité de recharger leur véhicule sur n'importe quel chargeur disponible à proximité. Par conséquent, la compatibilité CCS peut être utile pour vous assurer de ne pas être bloqué n'importe où. Cependant, le simple fait d'avoir l'adaptateur CCS vers NACS ne suffit pas, du moins pas pour tous les modèles Tesla. Pour certains, vous avez également besoin d'une mise à niveau CCS Tesla. Entrons dans le pourquoi et le comment.
Que signifie Tesla CCS Retrofit ?
La mise à niveau du CCS Tesla, également parfois appelée « rendre votre Tesla compatible CCS », implique la modification du port de charge et du logiciel du véhicule pour s'adapter à la charge CCS.
Les véhicules Tesla compatibles CCS peuvent bénéficier d'une charge CA et CC sur une seule prise, de vitesses de charge plus rapides et d'une interopérabilité avec une large gamme de bornes de recharge sans superchargeur, y compris des réseaux tiers et des bornes de recharge publiques.
LequelModel s Besoin de rénover ?
Voyons chaque scénario :
Scénario 1 :
Seuls les modèles Tesla équipés de l'ECU de charge construits avant octobre 2020 nécessitent une mise à niveau pour la charge CCS.
- Même si votre Tesla est équipée du port CCS, mais dispose d'un ECU antérieur à octobre 2020, vous aurez peut-être besoin de la mise à niveau. En effet, le logiciel de votre voiture n'est pas compatible CCS. La seule différence est que vous n'aurez pas besoin de l'adaptateur CCS vers NACS.
- Si vous disposez du port NACS avec l'ancien ECU, vous aurez besoin des deux : du retrofit et de l'adaptateur.
Scénario 2 :
La plupart des véhicules Tesla les plus récents sont équipés d'un logiciel de charge CCS, ce qui signifie que tout ce dont vous avez besoin est un adaptateur CCS vers NACS.
Vous pouvez vérifier si vous avez besoin de la mise à niveau depuis votre application Tesla comme expliqué ci-dessous.
Comment planifier un rendez-vous de rénovation
Étape 1 : Allez à votre voiture et vérifiez si votre voiture a besoin d'être modernisée à partir des paramètres ci-dessous
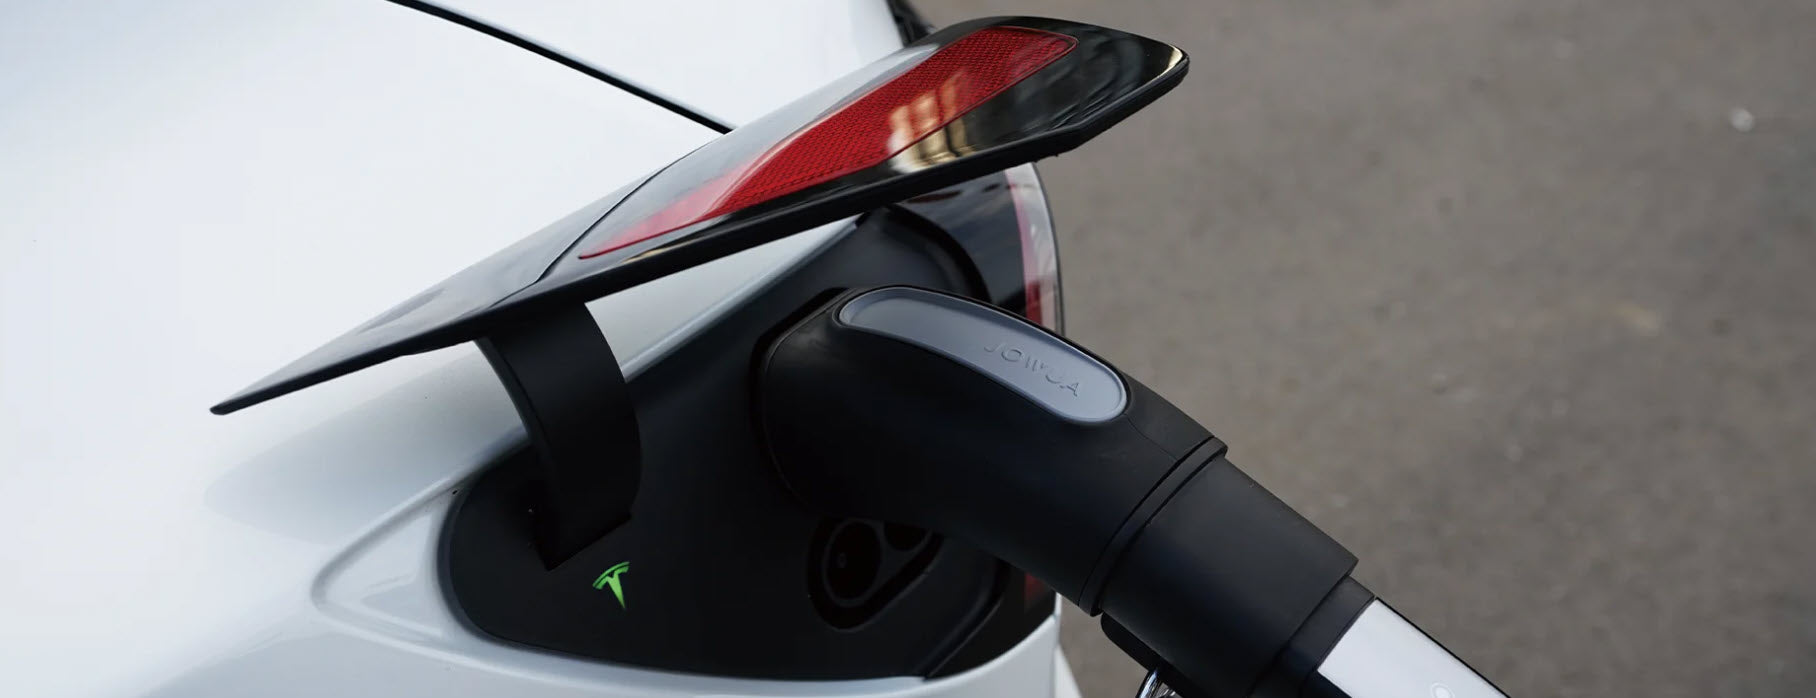
Pour ce faire, touchez Contrôles > Logiciel > Informations supplémentaires sur le véhicule > Champ de prise en charge de l'adaptateur CCS.
La vidéo montre « Charge CCS et NACS CC tiers : Activé « C'est le cas lorsque vous n'avez pas besoin d'une rénovation ou que vous avez terminé la rénovation avec succès.
S'il est indiqué « Non installé » », alors il faut la rénovation.
Étape 2 : Si une mise à niveau est nécessaire, planifiez-la depuis l'application Tesla
Étape 3 : Apportez votre Tesla au centre de service Tesla où vous avez pris rendez-vous
Rénovation pour
Si cela vous semble coûteux, vous pouvez suivre le guide DIY ci-dessous, mais n'oubliez pas que confier cette tâche à des experts vous apportera toujours une certaine tranquillité d'esprit. Après tout, vous modifiez le port de charge de votre voiture.
De plus, l'installation par vous-même nécessite de nombreuses connaissances sur l'entretien de votre voiture. Ne l'essayez donc que si vous avez une connaissance pratique de votre voiture.
Guide de bricolage pour la modernisation du CCS Tesla pourModel s 3 et Y
*** Nous vous suggérons fortement de confier cette tâche à Tesla. Ce n'est pas un processus simple et la plupart des propriétaires n'ont pas les connaissances nécessaires pour effectuer cette mise à niveau.Ne procédez que si vous avez l'expérience et le savoir-faire ***
L'adaptation de votre Tesla à la recharge CCS est un processus en plusieurs étapes qui nécessite une réflexion approfondie et une expertise technique. Voici un guide complet pour vous aider :
Étape 1. Recherche et consultation
Avant de lancer la modernisation du CCS Tesla, effectuez des recherches approfondies pour comprendre les implications et les avantages de la recharge CCS pour votre modèle Tesla.
De plus, demandez conseil à des professionnels expérimentés pour évaluer la faisabilité et la compatibilité de la modernisation de votre véhicule spécifique.
En gros, il existe deux types de rénovations pour
Réaménagement de type 1 :
- Ceci s'applique à l'Amérique du Nord
Model 3 réalisés après le 4 octobre 2020 ou NAModel Y - Il vous suffit de remplacer l'ECU par l'ECU Gen4 complet (numéro de pièce Tesla 1537264-00-B)
Réaménagement de type 2 :
- Ceci s'applique à l'Amérique du Nord
Model 3 réalisés avant le 5 octobre 2020 - Nécessite de remplacer l'ECU par l'ECU Gen4 complet (numéro de pièce Tesla 1537264-00-B)
- Nécessite également l'ajout d'un faisceau de câbles tiers compatible avec l'ECU Gen4.
2. Procurez-vous les composants nécessaires
Acquérir les composants essentiels pour la modernisation du CCS Tesla.
Les composants dont vous pourriez avoir besoin incluent :
- ECU compatible que vous pouvez obtenir auprès du centre de service Tesla près de chez vous
- Le faisceau de câbles, si nécessaire
- Clé à douille de 10 mm
- Tournevis ou outil de retrait des fixations de garniture
- Autres outils en vrac
Assurez-vous que les composants répondent aux normes de qualité et proviennent de fournisseurs réputés pour garantir des performances et une sécurité optimales.
Étape 3. Débranchez la source d'alimentation
Débranchez la source d'alimentation du véhicule en désactivant la batterie principale, avant d'effectuer toute modification.
Pour ce faire, appuyez simplement sur Contrôles > Sécurité > Éteindre
Débranchez également la batterie haute tension et les contacteurs haute tension situés sous votre siège arrière.
Vous pouvez vérifier le
Étape 4. Retirez l'ECU existant
Retirez la garniture et le tapis du coffre de votre Tesla près du port de charge.
Vous constaterez que l'ECU existant est configuré ici
Appuyez sur les clips du faisceau de câbles pour séparer l'ECU de ceux-ci. S'il y a des vis supplémentaires maintenant l'ECU, dévissez-les pour les retirer.
Soyez prudent afin d’éviter d’endommager les composants environnants et de maintenir l’intégrité de la structure du véhicule.
Étape 5. Installer le nouvel ECU
- Branchez le nouveau faisceau de câbles dans le nouvel ECU
- Placez le nouvel ECU dans la position de l'ancien ECU dans la voiture
- Assurez un alignement correct et fixez l'ECU dans la bonne position en le fixant avec des vis.
- Connectez le faisceau de câbles pour intégrer l'entrée CCS au système électrique du véhicule, en suivant les directives du fabricant et les schémas de câblage pour une configuration précise.
Étape 6. Mettre à jour le logiciel
Une fois l’installation terminée, effectuez des tests approfondis pour valider la fonctionnalité.
- Rebrancher la batterie haute tension
- Allumez l'alimentation depuis l'écran Tesla Contrôles > Sécurité > Mise sous tension
- Ensuite, installez le logiciel de charge mis à jour sur votre voiture à partir de Contrôles > Logiciel > Mode Service (accessible en maintenant la touche
Model nom) - Après cela, vérifiez Contrôles > Logiciel > Informations supplémentaires sur le véhicule > vérifiez le champ de prise en charge de l'adaptateur CCS - Il devrait maintenant indiquer « Activé » si vous avez tout fait correctement.
Vérifiez que le port de charge CCS communique efficacement avec les bornes de charge externes et évaluez les performances de charge pour garantir une efficacité et une fiabilité optimales.
Si vous disposez du port NACS, vous devrez utiliser l'adaptateur CCS vers NACS, sinon vous pourrez charger sans.
La mise à niveau ne supprime aucune norme de charge existante. Elle y ajoute simplement le CCS, de sorte que vous devriez toujours pouvoir charger sur un compresseur même avec le nouvel ECU.
Étape 7. Finaliser et certifier
Une fois les tests terminés avec succès et la fonctionnalité confirmée, obtenez une certification ou une validation auprès de techniciens autorisés pour authentifier les modifications de modernisation et garantir la conformité aux normes et réglementations de sécurité en vigueur.
Devez-vous procéder à la rénovation ?
Cette médaille a deux faces :
Points en faveur de l’obtention du Tesla CCS Retrofit :
- Avec l'ouverture des Superchargeurs aux véhicules non Tesla, la modernisation peut vous éviter de longues files d'attente et des temps d'attente en vous permettant de recharger vos véhicules dans d'autres stations de recharge
- Toutes les bornes de recharge CCS ne passeront pas immédiatement au NACS
- Les superchargeurs sont chers
Points contre l’obtention du Tesla CCS Retrofit :
- Étant donné que presque tous les constructeurs automobiles adoptent le NACS, les bornes de recharge seront, tôt ou tard, équipées du NACS
- Avec le réseau de Superchargeurs en constante expansion, un Superchargeur peut bientôt apparaître à proximité de chez vous, rendant la modernisation obsolète dans quelques années
- Même les stations-service s’équipent de NACS. British Petroleum a déjà annoncé un investissement de 100 millions de dollars dans les bornes de recharge NACS et prévoit de l'augmenter à 1 milliard de dollars d'ici 2030
- La modernisation à 350 $ coûte cher
Ainsi, pour l'instant, si vos besoins en matière de recharge ne nécessitent pas une modernisation immédiate, vous pouvez la reporter de quelques années pour voir comment l'infrastructure de recharge évolue.
Read more
How to
Comment nettoyer le Cybertruck?
Le Cybertruck nécessite un entretien particulier en raison de son extérieur en acier inoxydable, entre autres raisons. Par conséquent, nous avons compilé une liste d'étapes de nettoyage que vou...
Czytaj dalej
Oui, vous pouvez connecter 4 contrôleurs à une Tesla
Découvrez comment améliorer votre expérience de jeu Tesla avec le plaisir multijoueur ! Notre guide vous montre comment connecter jusqu'à quatre contrôleurs à votre Tesla, parfait pourModel Les...
Czytaj dalej
Zostaw komentarz
Ta strona jest chroniona przez reCAPTCHA i obowiązują na niej Polityka prywatności i Warunki korzystania z usługi serwisu Google.